
All Posts, Helpful Info, Printing Equipment
DTF Transfers, Fitting with a Cricut Easy Press Made Simple
Oct
DTF Transfer Magic with a Cricut Easy Press and Low Temp Transfers
DIY T-Shirt, Fitting DTF Transfers with Your Cricut Easy Press
Using Your Cricut Easy Press to Fit Custom DTF Transfers
Ever stood before a blank fabric, holding a DTF transfer and you own a EasyPress, feeling the thrill of creativity mixed with a hint of uncertainty? That’s right. It can be like standing at the edge of your own personal artistry frontier.
I’ve been there too; hands shaking slightly as I balanced my design on the cotton t shirt, praying it would turn out just as envisioned. Sounds familiar?
Using Direct-to-Film transfers with a Cricut EasyPress can feel like taming wild horses — powerful yet potentially chaotic without proper guidance.
Well lets take this journey together, we’ll discover how to select the perfect size for your EasyPress based on project needs. We’ll explore troubleshooting common issues that might spring up during pressing. And then we’ll even compare two popular machines – Cricut EasyPress and a Standard Heat Press – to help you make informed choices.
Table Of Contents:
- Understanding DTF Transfers and Cricut EasyPress
- Choosing the Right Size of Cricut EasyPress
- The All New Auto Press
- Troubleshooting Common Issues with the EasyPress
- The Cricut Easypress Vs The Cricut Autopress Vs a Professional Heat Press
- FAQs in Relation to Fitting Dtf Transfers With a Cricut Easy Press
- Conclusion
Understanding DTF Transfers and Cricut EasyPress
The world of fabric printing is ever-evolving, with advancements like Direct-to-Film (DTF) transfers bringing new possibilities. It’s an exciting time for crafters, print shops, or anyone wanting to bring their designs to life on fabric.
One of the latest trends is for crafters is to own a Circut and create basic HTV designs and fit them to T Shirts using an easy press, great but by adding ready to press DTF transfers to you arsenal and using the Cricut EasyPress to fit them, you can now do full colour images and even photos. We know this is an exciting step for all those out there that have been creating some cool T Shirts with their Circut.
What is DTF Printing?
To start off simply, think about those vibrant full-colour designs you see printed on T-shirts – they’re often the work of DTF transfer printing. This method allows intricate multi-coloured patterns to be transferred onto fabrics without losing any detail or vibrancy. But how does this happen?
A specialised printer is used to create heat-sensitive transfers, using special film, ink and adhesive. The film acts as a carrier which holds all elements of your design together during the creation, and allows for them to be seamlessly transfer onto your T Shirts and apparel. Once applied using heat and pressure (hello Cricut EasyPress.), it releases from the film and adheres firmly onto your chosen material.
No need for screens or to set-ups seperate colours, this means less hassle. The results are high-quality prints that are durable yet feel soft against skin – making them perfect even for baby clothes.
Overview of Cricut EasyPress
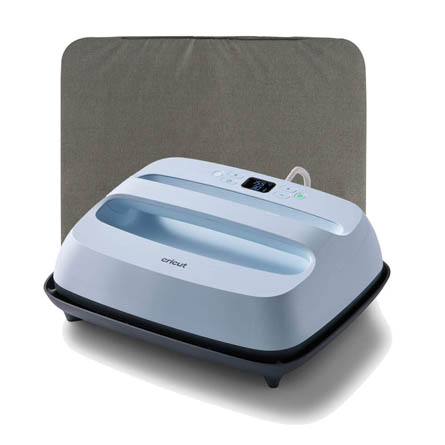
If we were talking cars instead crafts gear here: consider the Cricut EasyPress as the slick, compact city car that packs a punch. It’s favoured for its ease of use and consistent heat distribution – crucial elements when working with DTF transfers.
Whether you’re crafting onesies or designing tote bags, there’s an EasyPress size tailored for your project. Each model even offers adjustable temperature settings up to 205°C. When you do not need a full size heat press for your creative endeavour, the EasyPress is perfect.
Just use your ready to Press DTF transfers, a Cricut EasyPress, and let the magic happen. With these tools in hand, you can easily create vibrant and detailed designs on any fabric of your choice. It’s an easy process that doesn’t need any complicated setup or prior experience.
Choosing the Right Size of Cricut EasyPress
When it comes to heat press machines, size does matter. The Cricut EasyPress is available in a variety of sizes to cater for your unique project needs. Circut even now have a small Heat Press that is just like the Comercial machines, just a smaller form and designed for the home hobist.
Benefits of the Baby Version
The smaller ‘baby’ version of the Cricut EasyPress, often referred to as ‘Baby Press’, offers many benefits. Firstly, its compact nature allows for easy storage and transportation – perfect if you’re on-the-go or tight on space.
This pint-sized powerhouse isn’t just about convenience though. It’s also fantastic at tackling small-scale projects with precision that larger models might struggle with – think baby onesies, hats or pocket designs. Its nimble dimensions mean that no detail is too tiny.

When to Use the Larger 12×10 Version
In contrast, bigger crafting tasks call for more muscle power. That’s where our heavy-duty friend steps up: the 12×10 inch version of Cricut EasyPress.
Larger transfers such as full-frontal T-shirt designs are this model’s bread and butter because they need an evenly distributed heat across a wider area which can be provided by this variant effectively. Moreover, printing banners or yard signs? You’ll appreciate how quickly it handles large surface areas without compromising quality.
Here are some tips to ensure the best results when using DTF transfers with the Cricut EasyPress:
- Make sure your design is properly prepared and sized using software like Adobe Photoshop.
- Use Press Ready Transfers purchased from DTF Transfers Australia.
- Once you have your transfers, place the EasyPress pillow on a firm surface.
- Position the T Shirt or apparel to be printed on the pillow.
- Ensure the fabric is smooth and flat on the pillow.
- Pre-Press your T Shirts or apparel to make sure there is no moisture present.
- Place the transfer in the desired position on the T Shirt or apparel.
- Set the time and temperature on the EasyPress to the recommended settings supplied with the transfers.
- Place a piece of baking paper over the Transfer.
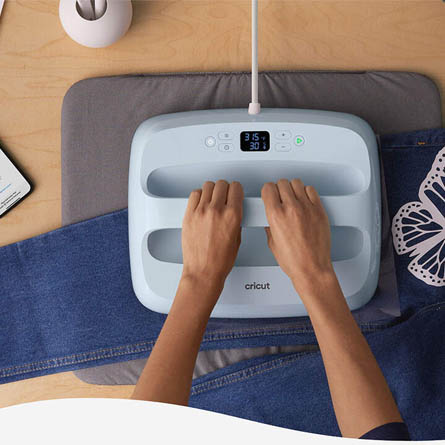
- Move the Cricut EasyPress over the transfer for heat pressing.
- Apply heat pressure for about 15 seconds, adjusting as needed for material thickness.
- Remove the Cricut EasyPress and peel the transfer film away.
- Do a finishing press, place the baking paper over the transfer, and press for a second time at the same temperature and time.
Important: You will need to make sure you use a lot of pressure when using the Cricut EasyPress, if not enough pressure is used you will not acheive a well bonded transfer.
By following these steps and tips, you can achieve optimal results when using DTF transfers with the Cricut EasyPress. Happy T Shirt printing.

The All New Auto Press
For the small business that is seeking to revolutionise their transfers with DTF transfers, as well as hobbyists in search of the ability to fit T-shirt transfers, look no further! Cricut has just launched the Cricut Autopress, a game-changer for small workshops and studios.
A Heat Press for Home Crafters
Much like commercial heat presses that are available on the market, the Cricut Autopress is designed specifically with home crafters and hobbist in mind. It offers an optimal blend of professional-level performance and user-friendly operation. This makes it perfect not only for experienced HTV pressing experts but also beginners who are just starting their journey into custom printed T-shirt transfers.
Why Choose The Cricut Autopress?
- Ease-of-use: Unlike some traditional heat presses which can be complex and intimidating, the Cricut Autopress is simple to operate even if you’re new to DTF Transfers.
- Precision: With its digital temperature and time control feature, this press ensures precise heating every time you use it – crucial when working with sensitive materials like DTF Transfers.
- Versatility: Whether you’re using it professionally or personally, its wide range of settings allows users to work on various types of fabrics and designs easily.
If you’ve been considering investing in a heat press but have been put off by their complexity or high price tags, then consider giving the new Cricut Autopress a try.
Just a work of caution the platten size is only 15×12 inch, and when you look at a commercial press it will normally be 18×20 inches, if you only plan on doing small transfers this might be the perfect option, but if you are wanting to do larger Transfers, it might be worth the little extra expense to get a proper Heat Press. A company like Adzon can help with advise on what is the best option for you and your needs.
Getting Started with the Cricut Autopress
Ready to get started? The first step is familiarising yourself with how the machine works. Thankfully, Cricut provides comprehensive guides and tutorials on their website for this purpose. Once you’ve got a handle on it, you can start exploring its many features and benefits in detail.
In short, whether you’re a professional looking to streamline your operations or a hobbyist wanting to create stunning T-shirt transfers at home, the Cricut Autopress offers unparalleled performance and convenience. So why wait? Start reaping the benefits of this fantastic tool today!
Troubleshooting Common Issues with the EasyPress
Let’s face it, nothing is perfect. Even the robust EasyPress, renowned for its durability and ease of use, can sometimes present challenges. But don’t fret. Here, we’ll offer some practical tips to help you resolve any issues.
Dealing with Errors
Gaining insight into what may have went wrong and how to work through it can be a great help. While this section is not exhustive it will cover the basics and help you wrok through any problems.
A useful tip: Make sure the machine is connected securely to a power source that matches its voltage requirements (check your user manual). Also check if there are any visible signs of damage on the cord or plug; safety comes first.
If everything looks good but you’re still experiencing issues, then it might be time for professional help. Feel Free to send us an email with the issues that you are experiencing and we can see if we can give you the right advise.
Well lets have a look at the common problems.
Pro Tip: in our experience it is possible to use hot peel transfers and fit them with a Cricut EasyPress, but in our experience, it is very difficult if not impossible to fit cold peel and specialty transfers, these do require more pressure than can be applied when using a Cricut EasyPress.
Poor Quality Transfers
You’ve done everything right but your transfers just aren’t coming out as expected? The culprit could lie in how well you prepped your fabric before pressing.
To ensure high-quality results from DTF transfers – remember our motto “Preparation Prevents Poor Performance”.
Pro Tip: Pre-press the T Shirt, Apparel or the fabric.
Pro Tip: Do not wash the T Shirts and Apparel prior to fitting, use New T Shirts and Apparel.
If you have per-washed the material and used a fabric softeners this can hinder transfer adhesion, make sure all materials are completely dry and ironed flat prior starting work.
It is important to avoid washing with harsh chemicals prior to fitting your transfers.
This small prep work goes a long way towards achieving those professional results we all strive for.
Transfer Peeling After Washing
If your DTF transfers start peeling off after a few washes, it’s likely that the heat setting on your EasyPress was too low during application. This might not be immediately obvious as initially, the transfer may look just fine.
Another cause of transfers peeling after fitting can be that not enough pressure was applied during the fitting process. This is something that is hard to gage when using a Cricut EasyPress, using a heat press will remove this doubt around pressure.
Caution. use the recomended temperature and time settings supplied with your transfers, Do testing, it is important to do your own testing as different hequipment may have some different requirements. When using different material you may need to adjust your temperature and time. eg Cotton and Polyester will need different settings.
Don’t forget, the key to successful DTF transfers is prepping your fabric correctly. Avoid using T Shirts andapparel that has been washed, ensure the T Shirt is perfectly dry and flat before you start, do a pre-press. With these steps in place, you’ll be set for quality results every time.
My Transfers are not sticking to the Shirt
If you’re having trouble with your DTF transfers not adhering properly to your shirts, don’t fret. This is a common issue among both seasoned printers and hobbyists alike. More often than not, this problem arises due to incorrect heat and time settings on your Cricut Easy Press or Heat Press.
Understanding Heat Settings
The first step in resolving this issue involves understanding how crucial proper heat settings are when applying DTF transfers. If the temperature is too low, the adhesive will fail to activate, resulting in a transfer that won’t stick onto the fabric. On the other hand, if it’s too high, you risk damaging both the shirt and transfer (the Transfer will normally be difficlut to peel if to much temperature is used).
Finding The Right Time Settings
Besides temperature adjustments, correct timing plays an equally important role in successful DTF transfer application. Leaving your press on for too long can cause overheating while insufficient pressing time may result in incomplete adhesion of your design onto the t-shirt.
Trial And Error Process
To find out what works best for you might involve some trial-and-error process as different materials react differently under varying conditions. Therefore it’s vital that you test various combinations of heat and time settings until you achieve optimal results with each type of material used.
- Step 1: Start by adjusting one variable at a time – either increase or decrease temperatures slightly from recommended levels.
- Step 2: Next alter pressing times incrementally keeping track of any changes observed after each adjustment made.
- Step 3: Repeat this process until you achieve a satisfactory result where your DTF transfers stick perfectly to the shirts.
- Step 4: Just remember pressure also plays a key part to the fitting of DTF Transfers, you will need a good amount of pressure applied to the transfer during the fitting process.
Remember, every heat press machine is different and so are the types of fabrics used. Hence, there’s no one-size-fits-all solution when it comes to getting your DTF transfers to adhere properly onto t-shirts. Patience and practice will eventually lead you towards mastering this art.
The Cricut Easypress Vs The Cricut Autopress Vs a Professional Heat Press
When it comes to fitting DTF transfers, the type of press you use can significantly impact your final product’s quality. In this article we have explored three popular options: the Cricut Easypress, the new Autopress from Cricut and a professional heat press.
Cricut Easypress
The Cricut EasyPress is designed for hobbyists who already owns a cricut HTV machine and wants to add DTF transfers to how they fit transfers, they will normally already own a Cricut EasyPress, the results without investing in a professional-grade machine are more than satasfactory. It offers adjustable temperature settings up to 205°C, making it versatile enough for various materials. However, its smaller size may limit large-scale production or larger designs. The EasyPress is also only suitable for fitting Hot Peel Transfers, and you should not attempt to fit cold peel and speciality transfers with them.
Cricut Autopress
As an upgrade on the EasyPress, the AutoPress pressure adjustments along with its digital temperature and time settings—making application easier and more accurate than ever before. While still not as robust as some commercial machines, and a smaller platten size this model bridges the gap between casual crafting and small business operations.
Professional Heat Presses
Professional heat presses tend to be more expensive but offer superior durability, precision control over time, temperature and pressure variables which are critical when applying DTF Transfers accurately. They’re ideal for businesses that need high-volume output with consistent quality across every piece produced.
- Ease of Use: All of these have their pros and cons, and all of the options may require a learning curve.
- Consistency: Professional machines offer the highest level of consistency due to their advanced controls and robust construction.
- Volume: If you’re running a business with high volume needs, a professional press will be more efficient than either Cricut model.
In conclusion, your choice between these three options should hinge on your specific needs as well as budget constraints. Hobbyists might find that the EasyPress or AutoPress offers everything they need at an affordable price point, whereas businesses requiring large volumes or consistent quality might opt for a professional machine despite its higher cost.
Ultimately, the choice between the Cricut EasyPress the Cricut Autopress or a professional heat press depends on your specific needs and preferences. Often the price will plays a deciding factor in what you will purchase along with your budget, but if you can afford it a professional heat press will give better results to the transfers that you are fitting.
Consider factors like project size, budget, and ease of use to make an informed decision. Whichever machine you choose, both are reliable options for achieving professional-quality fabric printing. Companies like Adzon can help with advise so you get the right equipment the first time and help you save money in the long run.

FAQs in Relation to Fitting Dtf Transfers With a Cricut Easy Press
Can you use Cricut heat press for DTF transfers?
Absolutely, the Cricut EasyPress can apply hot peel DTF transfers. Just ensure the right temperature and time settings are used.
What heat press settings for DTF transfer?
The typical setting is 135°C with a pressing time of around 15 seconds. But it’s crucial to check your specific product guidelines first.
Do you use a heat press for DTF?
Yes, using a heat press like the Cricut Autopress is essential in achieving quality results with DTF transfer printing.
Can you use a mini heat press for DTF?
You can definitely use a mini-heat press such as the Baby version of Cricut EasyPress; however, make sure it covers your entire design area adequately.
Conclusion
Mastering the art of fitting DTF Transfers with a Cricut Easy Press or the Cricut Autopress is like unravelling your creative potential. Now, you understand what Direct-to-Film printing entails and why it’s adored by printers.
You’ve learnt about the perks of using an EasyPress – both in its compact form for detailed work and larger size for bigger projects. Armed with this knowledge, choosing the right size will be less daunting.
Through this exploration, we’ve uncovered practical steps to troubleshoot issues that might occur during printing; a skill every printer needs!
We also peeked into the world of HTV Ront Auto EasyPress – a worthy competitor indeed. Remember their differences when making choices because informed decisions lead to great outcomes.
In essence, mastering these tools means turning fabric into canvases ready for your imagination’s brush strokes. So go on, create something extraordinary today!