DTF(Direct to Film) Transfers Fitting Instructions
THESE ARE NOT IRON ON TRANSFERS…
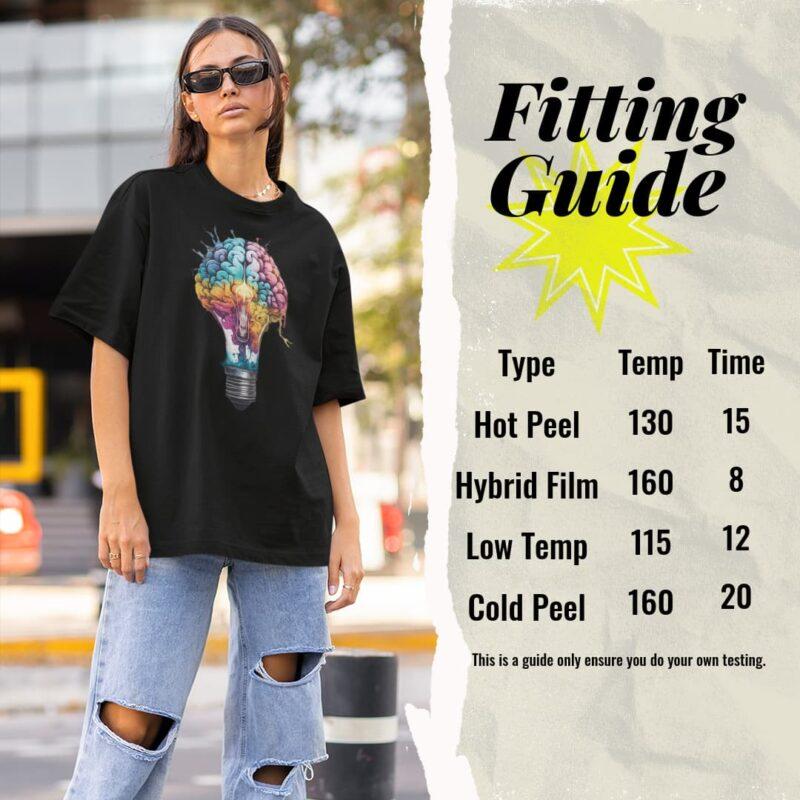
Here’s a guide for using Our DTF Transfers (Direct-to-Film).
Please follow the instructions below.
Keep in mind that these instructions are fairly general and you should do your own testing as settings may vary between different heat presses.
Materials Needed:
- DTF Transfer
- Cover Sheet, (Teflon Sheet or Parchment Paper.) Baking Paper can also be used.
- Heat Press
- T-Shirt or fabric to print on
- Heat Proof Tape if fitting to hats
- Sticky Lint Roller for Speciality Transfers
Hot Peel Instructions:
Here’s a guide for using Our Hot Peel Direct-to-Film (DTF) Transfers
THESE ARE NOT IRON ON TRANSFERS. ENSURE YOU DO YOUR OWN TESTING PRIOR TO FITTING ONTO FINISHED GARMENTS.
Keep in mind that these instructions are fairly general and you should do your own testing as settings may vary between different heat presses.
Materials Needed:
- DTF Transfer
- Cover Sheet (Teflon sheet or parchment paper)
- Heat Press
- T-Shirt or fabric
- Heat Proof Tape if fitting to hats
- Lint Roller
Hot Peel Instructions:
- Prep Stage: Use a lint roller to remove any unwanted fibres from the garment. Place your shirt or fabric onto the heat press. Perform a pre-press to remove any moisture from the garment, and flatten the print surface.
- Apply the Transfer to Your Garment: Position the transfer on the garment with the adhesive side facing down. Ensure that it’s correctly placed before applying heat. (If fitting to hats ensure to tape the design in place with heat proof tape)
- Place the Cover Sheet over the Transfer. Gently place the cover sheet over the transfer, you can use a Teflon sheet, or parchment paper
- Press the Transfer: Close the heat press onto the transfer and apply heat and pressure. The time and temperature will depend on your specific heat press and the transfer, but a general rule of thumb is around 130-135 degrees Celsius for 15-20 seconds.
- Hot Peel: After the heat press cycle, open the press, remove the cover sheet, and gently peel off the film from the corner to the opposite side. The design should now be transferred to your garment.
- Final Cure: To ensure the durability of the print, do a final cure. This step again requires the heat press, typically at the same temperature, press for an additional 10-20 seconds, with the cover sheet placed directly over the transfer.
Wait for the print to fully cool prior to folding the T Shirt and packaging.
Low-Temp Instructions:
Here’s a guide for using Our Low Temp Direct-to-Film (DTF) Transfers
THESE ARE NOT IRON ON TRANSFERS. ENSURE YOU DO YOUR OWN TESTING PRIOR TO FITTING ONTO FINISHED GARMENTS.
Keep in mind that these instructions are fairly general and you should do your own testing as settings may vary between different heat presses.
Materials Needed:
- DTF Transfer
- Cover Sheet (Teflon sheet or parchment paper)
- Heat Press
- T-Shirt or fabric
- Heat Proof Tape if fitting to hats
- Lint Roller
Hot Peel Instructions:
- Prep Stage: Use a lint roller to remove any unwanted fibres from the garment. Place your shirt or fabric onto the heat press. Perform a pre-press to remove any moisture from the garment, and flatten the print surface.
- Apply the Transfer to Your Garment: Position the transfer on the garment with the adhesive side facing down. Ensure that it’s correctly placed before applying heat. (If fitting to hats ensure to tape the design in place with heat proof tape)
- Place the Cover Sheet over the Transfer. Gently place the cover sheet over the transfer, you can use a Teflon sheet, or parchment paper
- Press the Transfer: Close the heat press onto the transfer and apply heat and pressure. The time and temperature will depend on your specific heat press and the transfer, but a general rule of thumb is around 115-120 degrees Celsius for 12-15 seconds.
- Hot Peel: After the heat press cycle, open the press, remove the cover sheet, and gently peel off the film from the corner to the opposite side. The design should now be transferred to your garment.
- Final Cure: To ensure the durability of the print, do a final cure. This step again requires the heat press, typically at the same temperature, press for an additional 10-20 seconds, with the cover sheet placed directly over the transfer.
Wait for the print to fully cool prior to folding the T Shirt and packaging.
Gang Sheet (Liquid Adhesive) Instructions:
Here’s a guide for using Our Gang Sheets with Liquid Adhesive Direct-to-Film (DTF) Transfers
THESE ARE NOT IRON ON TRANSFERS. ENSURE YOU DO YOUR OWN TESTING PRIOR TO FITTING ONTO FINISHED GARMENTS.
Keep in mind that these instructions are fairly general and you should do your own testing as settings may vary between different heat presses.
Materials Needed:
- DTF Transfer
- Cover Sheet (Teflon sheet or parchment paper)
- Heat Press
- T-Shirt or fabric
- Heat Proof Tape if fitting to hats
- Lint Roller
Hot Peel Instructions:
- Prep Stage: Use a lint roller to remove any unwanted fibres from the garment. Place your shirt or fabric onto the heat press. Perform a pre-press to remove any moisture from the garment, and flatten the print surface.
- Apply the Transfer to Your Garment: Position the transfer on the garment with the adhesive side facing down. Ensure that it’s correctly placed before applying heat.
- Place the Cover Sheet over the Transfer. Gently place the cover sheet over the transfer, you can use a Teflon sheet, or parchment paper
- Press the Transfer: Close the heat press onto the transfer and apply heat and HEAVY Pressure. The time and temperature will depend on your specific heat press and the transfer, but a general rule of thumb is around 165 degrees Celsius for 15 seconds.
- Hot Peel: After the heat press cycle, open the press, remove the cover sheet, and gently peel off the film from the corner to the opposite side. The design should now be transferred to your garment.
- Final Cure: To ensure the durability of the print, do a final cure. This step again requires the heat press, typically at the same temperature, press for an additional 10-20 seconds, with the cover sheet placed directly over the transfer.
Wait for the print to fully cool prior to folding the T Shirt and packaging.
These Transfers are not suitable for use with a CirCuit Easy Press.
Cold Peel Instructions (Specialty Finishes):
Here’s a guide for using Our Cold Peel DTF Transfers (Direct-to-Film).
Keep in mind that these instructions are fairly general and you should do your own testing as settings may vary between different heat presses.
Materials Needed:
- DTF (Direct to Film) Transfer
- Cover Sheet, (Teflon Sheet or Parchment Paper. You can use Baking Paper as well)
- Heat Press
- T-Shirt or fabric to print onto
- Sticky Lint Roller for Specialty Transfers
Cold Peel Instructions:
- Apply the Transfer to Your Garment: Place your shirt or fabric onto the heat press. Position the transfer on the garment with the adhesive side facing down. Ensure that it’s correctly placed before applying heat.
- Place the Cover Sheet over the Transfer. Gently place the cover sheet over the transfer, you can use a Teflon sheet, or Parchment paper.
- Press the Transfer: Close the heat press onto the transfer and apply heat and pressure. The time and temperature will depend on your specific heat press and the transfers, but a general rule of thumb is around 160-175 degrees Celsius for 15-20 seconds.
- Cool Peel: After the heat press cycle, open the press and remove the garment from the heat press, let the garment cool to room temperature. Once cooled, gently peel off the film from the corner to the opposite corner. The design should now be transferred to your garment.
- Remove excess material: On Specialty Transfers such as Gold Foil Transfers, use a sticky lint roller to remove any excess material, you may need to do several passes.
- Final Press: To ensure the durability of the print, you should do a final press. This step again requires the heat press, typically at the same temperature, press for an additional 10-20 seconds, with the Parchment paper placed directly over the transfer. Peel the parchment paper away immediately after the heat press cycles.
Wait for the transfer to fully cool prior to folding the T Shirt and packaging.
These Transfers are not suitable for use with a CirCuit Easy Press.
Specialty Finishes are more difficult to fit than standard Transfers and need a tighter tolerance.
Helpful tips
- For Cold Peel Transfers, do not remove the film from the garment when it is still on the heat press, it needs to be removed from the heat press first.
- If you notice some powder has transferred in the un-printed areas, you can simply cover the design with regular copy paper and press for 3 seconds (Maximum), and hot peel the paper after the heat press cycles. This will remove the excess powder
We take no responsibility for the incorrectly fitted of transfers, these are not iron on transfers, you will need to have a professional heat press to fit the transfers. We strongly recommend doing some test fitting before doing the final presses to a finished garment. Cheap Heat presses can have poor temperature control. Please be aware constant temperature, pressure and time are critical setting when fitting DTF Transfers to T Shirts and Apparel.
These are not iron on transfers